Showing posts with label tutorial. Show all posts

Thursday, September 08, 2011

Back to School Time

I cannot believe that my "baby" started the 7th Grade yesterday!  She still lets me take first day photos; I love  it!  Seventh grade is smack dab in the middle of "Middle School", so she's not the baby of the school nor is she the queen.  That's kinda nice, less pressure, just being.  I volunteered to hand out schedules as an excuse to be there without being one of "those" mothers (not that there's anything wrong with "those" mothers .... that's usually me!).  It was fun to see the anticipation in the kids' faces even as they are being so cool.  The volume in the cafeteria was LOUD as they all reconnected.  Several kiddos looked so shy and lost, while another group seemed to take up the room with their presence.  And that's middle school!  Miss T is just happy that most of her friends have the same lunch period, she was able to open her locker, and has a schedule she likes for the most part.

image from RadioButlers

Switching gears -- come join me on Pinterest!  I recently pinned this adorable School Supplies Cake from http://radiobutlers.blogspot.com/. Here's the direct link to the tutorial. SO STINKIN' CUTE!!  I can't wait to make one.

Gotta head to work -- Have a spectacular Day!!
Shawnee

Photobucket

Saturday, May 29, 2010

Apron Tutorial Found - Apron w/Hot Pads


I found a CUTE apron tutorial over at The Mother Huddle, for this fun apron with hot pads built in. Check it out HERE!!

Thursday, May 20, 2010

Teacher Appreciation Sweet Treats

I made these yummie treats last year, too, when we were at a different elementary school.  But new school, so I can do a repeat and no one (except you) is the wiser!

I bought the sundae glasses at the dollar store, along with those cute little notepads.  Layered inside are different types of candies or nuts depending on the teacher's preference, cotton candy for the whipped cream, a dove chocolate to simulate the cherry on top, and a straw for good measure.  Plus, that's what I wrapped the plastic and ribbon around.

Our favorite teacher (and neighbor), Mrs. Weaver, is also a Mary Engelbreit fan so we had to use ME stickers and ME ribbon on her "sundae"


 I originally saw this cute idea at a tutorial online from Kris at JesseKate Designs.  Kris is one of the adorable sisters at The DIY Dish -- you MUST watch their videos if you haven't yet.

Thursday, May 13, 2010

New Obsession - Cowboy Boot Purses

So, while in search for some crafty ideas for my Vintage Cowgirl Swap, I stumbled upon my newest and latest obsession: Upcycled Cowboy Boot Purses!! I saw a cute picture, then I found a tutorial, next a seller FROM OREGON, and now several sellers.

I've been scouring my local resale and goodwill stores for the past couple of weeks but have not been willing to pay $30 for a pair old boots I'm going to cut up and maybe ruin! Ebay has a few good deals (don't you sneak in ahead of me!), but now I AM SO EXCITED to pick up the cutest pair of red and black boots off of Craigslist this weekend for $15!! (I didn't have the heart to tell the gal I'm cutting them up.) Will my purse look like the professional's $400 purses? No. But will it be cute? I sure hope so!

And, apparently brilliant minds think alike because, on page 74 of the June/July 2010 issue of Mary Janes Farm, she has a how-to on, yes, "Cowboy-Boot Purses"!!!!

Check these out!

The tute that started it all, Janome's Recycled Cowboy Boot Purse tutorial


This is one of the more simple designs from the professionals at Diamond 57 in Oregon.
This looks almost doable for me, right?!? She's made purses for stars like Taylor Swift, and designed a couple of amazing bags for charity that were signed by Reba McIntyre. She will also custom make purses from your own pair of sentimental boots to the tune of $150 for single/$275 double plus $$ for all the extras.


I really like this double-boot model from West Texas Totes. But, at $434 plus $20 shipping, I think I'll work on my own!

Promise to post pictures of my work in progress!! Partner, don't be peeking!

UPDATE: My "tutorial" is posted HERE.

I'm also a Thirty One Gifts consultant - come check out our personalized bags, purses and gifts - or start your OWN business. Check it out HERE.


Sunday, April 25, 2010

Apron Sightings

I spent a little time crusing around the 'net and want to share a few sweet links and photos from gals who made their first apron or apron tutorial.

Creative Thursday made her first apron last October. So bright and cheery, it's reversible and lots of pockets. Plus, her blog is a joy to read. Right now, she and her husband/companion? are living in Paris!! You must check out their photos!

T-SHIRT APRON TUTORIAL
Disney of Ruffles and Stuff not only made her first apron, she created a delightful tutorial. These cuties are from t-shirts!! I LOVE this idea and cannot wait to try it out.
http://www.rufflesandstuff.com/2010/04/double-apron-day-easy-t-shirt-aprons.html


REGENCY APRONS
Becca from Brighthaven Days has created her first THREE aprons in the style of her love a regency romances.
Here's her first Regency Apron:
FAT QUARTER APRON TUTORIAL
WendyMoon of Wendy Moon Designs posted her first apron tutorial. She also designed the fabrics!!

http://wendymoondesigns.blogspot.com/2010/02/tutorial-fat-quarter-reversible-apron.html

And, lastly, I found an apron contest for all you apron lovers!!

Barbara Curtis of MommyLife.net is once again hosting an Apron Power Contest. You need to send her a photo of you in an apron by May 5. She will publish photos as she receives them - along with any story or comments you wish to share. Please feel free to be yourself - from side-splittingly funny to ultra-sincere. Your apron image and philosophy should be as individual as you are. What has become apparent is that aprons are not only practical, but a symbol of our calling and something which the family responds to with respect - and even awe. She thinks that's why it's been easy for her to develop the habit of wearing her own. Click for the details, and be sure to let me know if you enter. I'm thinking about it ... I'd love to win SIX books!! =)


I say it's time to bring back the apron - and I don't mean the unisex cloth chef's apron, but the frilly feminine - even to the point of useless - kind.

Send me a picture of you in your apron and I promise not only to run it, but to send the best ones a copy of my new book The Mommy Survival Guide. Remember, practical is okay (mine is practical because it covers a lot and is made of oilcloth), but the criteria for this contest includes femininity.

Other criteria:
You must be wearing the apron
Context and creativity

Tuesday, December 30, 2008

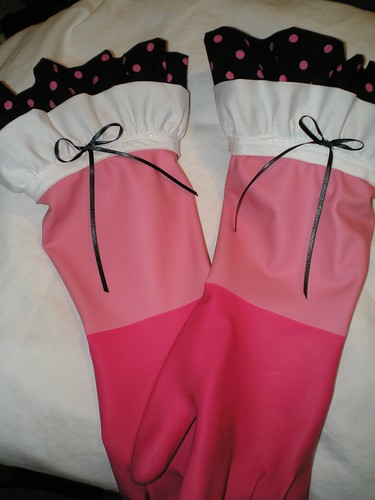
Embellished Gloves Tutorial

Here's a repost of my gloves tutorial. I've made six different cuff variations since this one, and am working on more tutes!

Gloves Tutorial:

Supplies: Gloves, leftover apron material, leftover trim and coordinating ribbon

The gloves are easy-peasy, just a bit finicky. Purchase Playtex gloves in a color that coordinates with your apron. Then cut two 24"x7" pieces of the (polka dot) material leftover from your apron and fold into 24"x3.5" strips (A). Finished the bottom edges of the strips (I used a zig-zag stitch, but serged would be best). (I corrected the strip measurements once I made them again! Sorry if I frustrated anyone!)

After marking the centers, gathered these strips to 12" which is the circumference of the gloves. Then cut a length of the white ruffled trim to the same 12" (B) and mark the centers. Match centers of both trim, evenly distribute the gathers, and stitch the polka dot ruffle (A) onto the white trim (B) about 1/4" up from the bottom so as to have a clean edge on the gloves.

Next, pin this double trim onto the gloves and carefully baste about 1/4" from the bottom of (B), then stitch along the very bottom edge of (B), being careful to hold the top of the gloves against the trim and not catch in your stitching unintentionally. This is the tricky part, since it does not fit around the free-arm of most machines. Stitch together the raw edges of trim, overlapping slightly.

Form a bow with the coordinating ribbon, hand sew onto the center front of the gloves and you're done!

Sunday, April 06, 2008

Gloves Tutorial (EDITED)4

Gloves Tutorial:

Supplies: Gloves, leftover apron material, leftover trim and coordinating ribbon

The gloves are easy-peasy, just a bit finicky. Purchase Playtex gloves in a color that coordinates with your apron. Then cut two 24"x7" pieces of the (polka dot) material leftover from your apron and fold into 24"x3.5" strips (A). Finished the bottom edges of the strips (I used a zig-zag stitch, but serged would be best). (I corrected the strip measurements once I made them again! Sorry if I frustrated anyone!)

After marking the centers, gathered these strips to 12" which is the circumference of the gloves. Then cut a length of the white ruffled trim to the same 12" (B) and mark the centers. Match centers of both trim, evenly distribute the gathers, and stitch the polka dot ruffle (A) onto the white trim (B) about 1/4" up from the bottom so as to have a clean edge on the gloves.

Next, pin this double trim onto the gloves and carefully baste about 1/4" from the bottom of (B), then stitch along the very bottom edge of (B), being careful to hold the top of the gloves against the trim and not catch in your stitching unintentionally. This is the tricky part, since it does not fit around the free-arm of most machines. Stitch together the raw edges of trim, overlapping slightly.

Form a bow with the coordinating ribbon, hand sew onto the center front of the gloves and you're done!

LinkWithin

Related Posts Plugin for WordPress, Blogger...